Check Availability Form
We're Here to Help
Billing
Getting Started
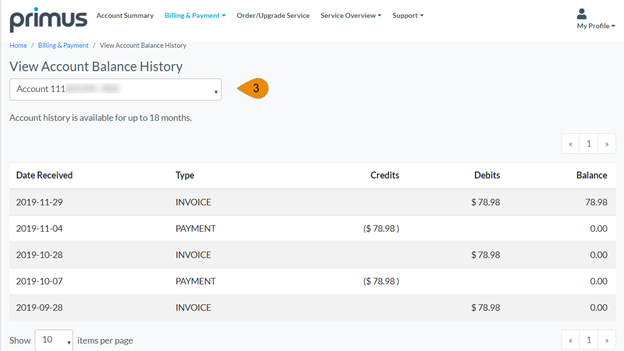
View Account Balance History
Your account balance history contains the last 18 months of transactions.
- Login to MyPrimus
- Select Billing & Payments from the top menu options. Then select View Account Balance History.

- If you have more than one account registered to MyPrimus, select the account you wish to view from the drop down menu.
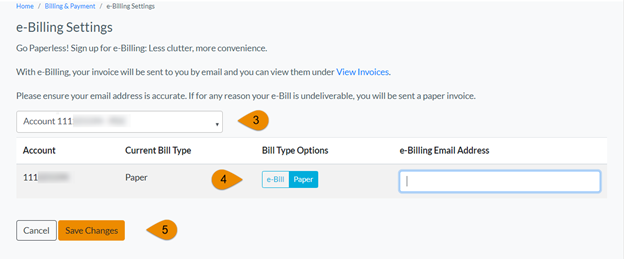
Change Billing Delivery Method
Through MyPrimus you can easily manage how you receive your monthly invoices. You can choose e-Bill or paper bills.
Note: By switching to e-Bill, you have access to 18 months of invoice history
- Login to MyPrimus
- Select Billing & Payments from the top menu options. Then select e-Billing Settings.

- If you have more than one account registered to MyPrimus, select the account you wish to view from the drop down menu.
- Select the billing delivery method.
- If you select e-Bill, enter a valid email address under the e-Billing Email Address. Note, that if you are already on e-Bill, you may also use the e-Billing Email Address field to update your e-Billing email address information.
- If you select Paper, your invoices will now be mailed to you each month. Note: When switching to paper you will lose access to view your current and previous invoices online.
- Click Save Changes.
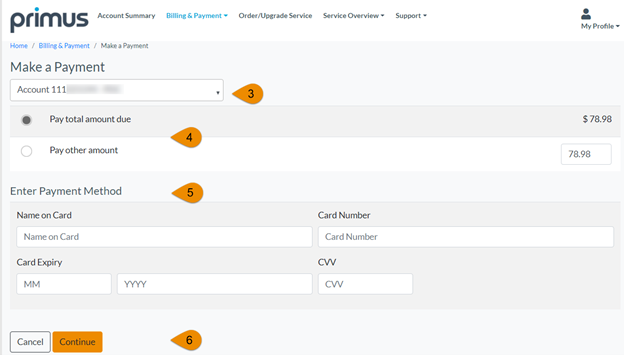
Make a Payment
- Login to MyPrimus
- Select Billing & Payments from the menu options. Then select Make a Payment.

- If you have more than one account registered to MyPrimus, select the account you wish to make a payment for.
- You can either pay the full amount due or alternatively, pay another amount
- Enter your credit card information under the Enter Payment Method section
- Click on Continue
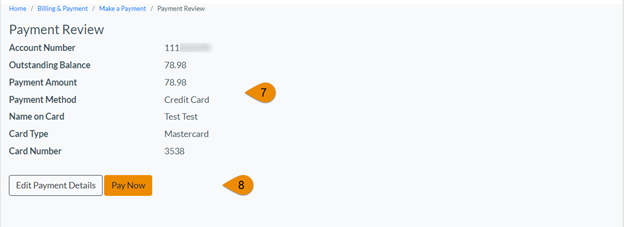
- Review your payment information
- Click Pay Now
For help with setting up pre-authorized payments, read Set Up & Manage Payment Method.
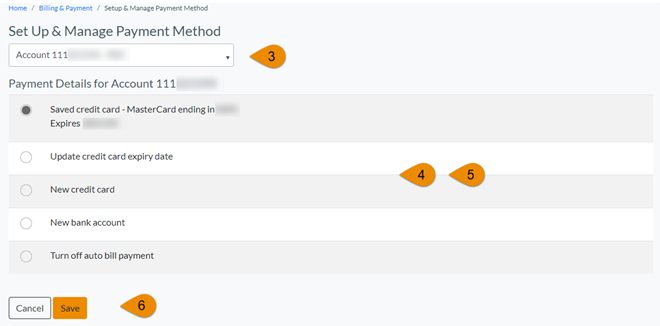
Set-Up and Manage Payment Method
It is important to keep your payment information up to date to avoid payment rejections or service interruptions. With MyPrimus you can make the following changes to your pre-authorized payments:
- Manage payment types – change between pre-authorized payments from your credit card or bank account
- Manage credit card account information – we accept Visa, Mastercard and Amex
- Update your credit card expiry date
- Login to MyPrimus
- Select Billing & Payments from the top menu options. Then select Set Up & Manage Payment Method..

- If you have more than one account registered to MyPrimus, select the account you wish to manage from the drop down menu.
- Select a Payment Method.
- Enter the new billing method information.
- Click Save.
Note: If you turn off auto bill payments, you will need to pay your invoices using another payment method such as:
- At most financial institutions (online, in person or by phone)
- Online through MyPrimus
- Over the phone by credit card
- By mailing a cheque or money order to Primus, PO Box 4662 STN A, Toronto, ON, M5W 5H4
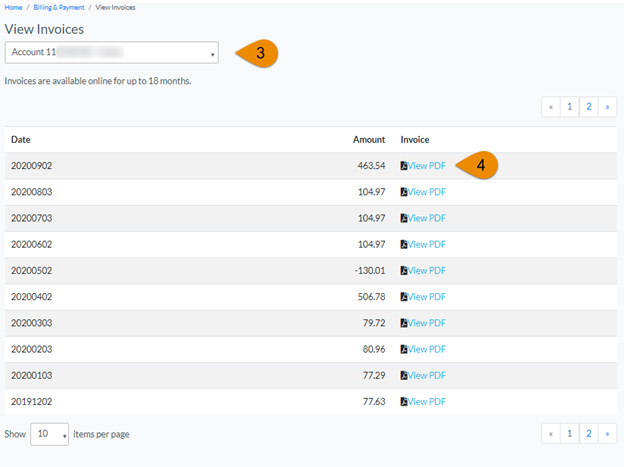
View Invoices
With MyPrimus you can view, save and print up to 18 months of invoices. Note, this feature is only available if you are registered to e-Billing. Click here to learn more on how to switch to e-Billing.
- Login to MyPrimus
- Select Billing & Payments from the top menu options. Then select View Documents.

- If you have more than one account registered to MyPrimus, select the account you wish to view from the drop down menu.
- Click on the View PDF link corresponding to the invoice date.
- The file will then download where you can view, save or print.
- The file will then download where you can view, save or print.
To learn more about how to read your invoice, click here.
Create Billing Inquiry Ticket
If you have a question regarding your invoice or service, you can use the below form to send us your inquiry. We will respond to your inquiry as quickly as possible.
- Login to MyPrimus
- Select Support from the top menu options. Then select Billing & Maintenance Inquiry.

- If you have more than one account registered to MyPrimus, select the account you wish to use from the drop down menu to create a support ticket.
- Fill out each field.
- Under Describe your service issue, enter as much detail as possible.
- Click Submit Ticket.
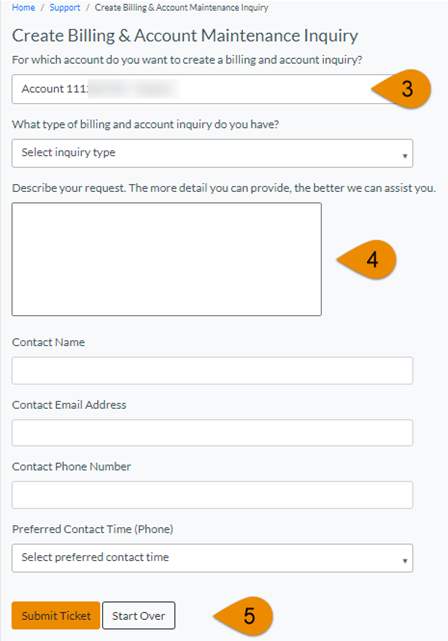
- Once your ticket has been submitted, you can monitor or update it as needed under Support then View Existing Tickets.